pages

Showing posts with label face. Show all posts

Thursday, September 15, 2011

Fundamental makeup brushes

The previous post (where I talked about the eyeliner brush that changed my life) got me thinking about brushes. If you’ve ever seen a makeup artist operate, you know that they can use 20 different brushes while doing one person’s makeup. It makes you wonder, “Do I really need all that?”. The answer is, probably not.

What are the basic brushes you should have in your set, if you’re trying to create a natural no makeup look? Here’s my list of “can’t imagine living without them” brushes. Depending on the brand they’ll have slightly different names but you’ll be able to recognize them nonetheless:

1. Large fluffy powder brush
Honestly, you can’t apply powder in a natural way without a brush like this. This one is an absolute must have. Use it to set your makeup with a little powder, to apply bronzer or powder blush (I like to do that with a big brush) and to give a good once over blending when you’re done. It’s the ultimate multi-tasking brush.

2. Medium sized eyeshadow brush
When I first applied eyeshadow with a decent brush, I knew I’d never go back. This brush allows you to apply your allover color and it is small enough to that it will work on the crease as well. I also use it to blend all eyeshadow colors together and eliminate any hard edges. I must have another 5 eyeshadow brushes - different sizes, shapes, tightness of bristles - but I use this one 90% of the time.

3. Pointy eyeliner brush (bonus points if double-sided with smudge brush on other side)
It was the subject of a recent post and it was the reason I started thinking about basic brushes in the first place. I love it because it turns my entire eyeshadow collection into eyeliners. I can use it dry or wet, I can draw anything detailed, I can smudge pencil eyeliner, I can use it for gel eyeliner… Endless possibilities.

Those 3 brushes are my essentials, come rain or shine, at home or on the road, whatever style of makeup I’m wearing. I’ve got an additional 3 that depend on day, need, mood and product.

4. Mineral foundation brush
If I happen to apply mineral foundation rather than a tinted moisturizer, I’m going to need one of these. They’re sturdier than a fluffy powder brush and they are much better at achieving the buffing effect needed.

5. Liquid foundation brush (synthetic bristles)
Definitely less essential … I don’t *need* a foundation brush but I admit it achieves a beautiful effect and it’s easy to use. I wouldn’t carry it with me if I were traveling, I’d just use my fingers. Choose a synthetic one that isn’t porous, picks up the right amount of product and is easy to clean.

6. Small concealer brush (synthetic bristles)
I’ve seen two essential styles for concealer brushes – one is a larger brush meant to create a more “airbrushed” result and another one is a small pointy brush meant to reach inner corners of eyes and cover pimples or other imperfections very carefully. While I’m all about the airbrush, I find that I achieve that well enough with my fingers, so I rely on my concealer brush for detail work. Again, I could live without this on a desert island or most occasions, really. : )
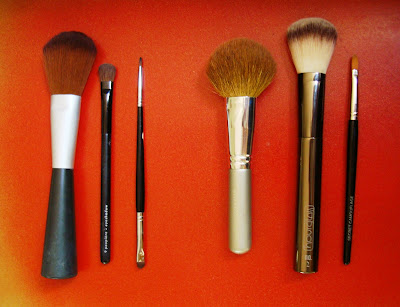
1 to 6, left to right (just noticed that all my brushes are from different brands!)


What are the brushes you can’t live without??

Tuesday, September 6, 2011

Perfecting skin – level 2


Skin is of supreme importance to the no makeup look. Like I discussed in the level 1 post of this series, our goals are to achieve a more even tone, less noticeable pores and a finish with a slight glow to it. In level 2 we’re looking for a little more coverage, which will help with the correction of any flaws. The type of product we will talk about is mineral makeup.

Much like millions of women, I am a fan of bareMinerals. When I first heard about it a few years ago I thought it was a marketing gimmick, just a new name for powder makeup, loose instead of pressed into a compact. Then I picked up a small amount of the stuff, rubbed between my fingers and was surprised by the almost creamy, silky texture. I remain a believer to this day.

You can visit their website to choose the right color for you. Stick with the original formula rather than the matte formula to better achieve the luminous finish.

Application is a cinch. Use one of their brushes – I prefer the Full Flawless Face brush – to pick up a small amount of product (less than a penny-sized amount of powder) that you’ve tapped onto the lid of the foundation pot. Swirl the brush around the lid to spread the powder evenly into the brush. Then use the brush to buff your skin using light round motions. There is really no way to go wrong with this technique. Start with just a little bit, take your time with buffing and add more if you feel it’s needed.

Skin looks perfected but entirely natural. Foundation does not settle into fine lines and the gentle buffing makes sure everything looks even. If your skin is oily, finish with hint of pressed or loose powder on your forehead, nose and chin. Two minutes and you’re done!

Friday, September 2, 2011

Exfoliating your way to better skin


If beautiful skin is at the heart of the no makeup look, then a great skincare routine needs to be part of it too. I’m sure there will be plenty of posts about skincare in my future. I just love the stuff – pretty bottles, amazing promises, great textures and scents… There’s only one problem: for most products it takes time and patience to see results. I like to say that I have many great qualities. Patience just doesn’t seem to be one of them!

So if you want results and you want them right now, you’re going to love exfoliation! This refers to all the types of products out there that get rid of the dead cells on the outermost layer of skin to give you a brighter and smoother complexion after just one use! Exfoliation can be mechanical – where you use grainy textures, loofahs or any other kind of abrasive – or chemical – where you let fruit enzymes  or acids such as salicylic acid or do the job for you. Both can be gentle or harsh so take the time to find what's right for you. Here are a few of my favorite things!

St. Ives Fresh Skin Invigorating Apricot Scrub – this is a US favorite and best seller. It comes in a decent sized tube or pot, it’s cheap and it does the job. Since it’s a little harsh on the skin (walnut shell is pretty rough) I use it mostly on my chest and back.

Clinique 7 Day Scrub Cream – another award-winning favorite! This one is much gentler thanks to its tiny micro-beads and creamy base. Clinique states that you can wear it every day but I recommend that you space it out to whatever makes sense to you (3x a week worked great for me).

Clarisonic Mia Brush – if there is such a thing as love at first scrub, this would probably be it. It’s incredibly gentle and recommended for all types of skin (even people with rosacea) but it’s very effective and pleasurable to use. Clarisonic states that “Mia cleanses so well that products absorb better, pores appear smaller, and fine lines and wrinkles appear reduced.” Use it with a gentle cleanser like Cetaphil and see your skin get better looking every day. Since it’s not that cheap consider it… an investment! “You’re worth it” and all of that! You can get a demo at Sephora and see what all the hype is about.

These were all different types of mechanical exfoliants. Let’s finish up with a chemical one for a little diversity!

Origins Brighter By Nature Brightening Peel with Fruit Acids – these pads are super easy to use. Just take one out of the pot, run it over your face until you’ve hit all the areas and you’re done! Follow with some moisturizer and be sure to wear SPF during the day. Not only will your face be smooth and clear, you should also see some improvement in your sun spots. Win win!

The important thing to remember about exfoliation is not to overdo it. I don’t currently wear all of these, but have had great results with them in the past. Try one of these for your face and see how it behaves before adding anything else. Start by doing it one or two times a week and increase as needed. Also, discuss what’s best for your skin with your dermatologist – they really do know best!

Tuesday, August 30, 2011

The right makeup for a perfect Drivers License picture

Since I recently had my picture taken for my Drivers License I didn’t think I had to worry when I ran to the DMV this morning to update some information. Well… I learned two important lessons:

1. Always be prepared (I’ve known that one for a while but forgot it this morning
2. DMV’s always take a new picture if you update your license in person at the office

Aaaaaarrrggghhh! My last picture was cute! Today my hair was wet in a pony tail and the only thing I had on my face was sunscreen! I’ll need to see the real deal to assess how bad it was, but I think there will be a next time real soon. Here’s what I recommend that you do when your turn comes.

After moisturizing, apply the level of foundation that is right for your skin right now – since I currently have no blemishes and it’s summer, for me it would’ve been tinted moisturizer. Follow it with concealer. Be sure to get your eyelids and inner corners of the eyes, under eye circles, around your nose and anywhere where you still see a little redness or imperfections.

While I would say that creating beautiful skin is the most important step in the regular no-makeup look, it’s less important for a picture at the DMV because the harsh flash erases a lot of flaws. That said, it also erases your features and shows a disproportionate amount of shine so focus on the next steps!

Add cream blush to the apples of your cheeks and blend. Consider making it a little more noticeable than usual to counteract the flash, which will wash you out.

Smudge brown eyeliner into your top lashes and add as many coats of mascara as you’d like for defined eyes. A little bit of highlighter in the inner corners will help you look awake.

Apply a natural looking lip stain that is darker than your lip shade – this is not the time for beige nudes – and add lip balm or a little neutral gloss if you like shiny lips in a picture.

You should look really great right about now! Let’s finish it off with 2 tricks. First, take a large soft brush and use it to pick up some pressed powder bronzer. Brush it all around the edges of your face – your jaw, ears, around the hairline and a little under the cheekbones. It’s a quick contouring to make you look slimmer and bring attention to the center of your face. Blend with a tissue to make sure there are no hard lines (which would look horrible in your pic!). Then take the same brush, dip it in a little loose powder and go over your t-zone to minimize shine. You need all the help you can get with that flash! Consider bringing blotting paper and using it just before your close-up.

Last but not least, consider your choice of outfit. Sometimes the pictures are cut at your neck, but sometimes your top will show. Remember that the background is turquoise blue and avoid any colors that clash. My favorite style remains a classic shape, like a button down or a top that shows my collarbone, like a boatneck cut, in a bright white.

The scoop neck bejeweled beige t-shirt I was wearing today, not so much… *sigh*

Sunday, August 28, 2011

One product to replace them all!

Many years ago, when I first tried self-tanner on my face, I was very careful. I made sure to use small quantities, rub it in at length and brush my nails after I was done with the application. After a few days of using it I was really happy with the results – the color was very natural and I looked healthy. I was proud of my cheat until a friend pointed out a small detail I had missed. There was a very clear demarcation line in the area where my jaw met my earlobe… I was mortified.

When you think of it, it was only natural... Never do I extend my face moisturizer onto my ears! Try it for yourself and see where your fingers go… Well, with tanner, you gotta! When you are done rubbing it in, work out the leftover from your fingers on your earlobes and around the ear. Now that you know this little trick, you’re ready to look your best.

Nobody does self tanners like Clarins – it’s like they have a magical formula that no one else’s heard of! Their Radiance-Plus Golden GlowCream-Gel is no exception. I recommend smoothing one pump of this product to your skin every night, and switch to every other night once the color is right. I swear you’ll end up wearing less makeup and fewer products when you wake up the next morning.


Thursday, August 25, 2011

Perfecting skin – level 1

Beautiful skin is essential to the no makeup look. It should look like your skin is naturally flawless. Here are the basics we are looking for:

  • Even tone – no blotches, redness, sun spots or pimples;
  • Small pores – not really erased since skin needs texture, but minimized;
  • Glowing – flawless skin isn’t shiny or matte but has a soft sheen to it, especially on cheeks. Sometimes referred to as dewy skin.


So how do we achieve that? There are many options and many levels of involvement. I’d like to start this series of posts with the lightest one, the tinted moisturizer.

Tinted moisturizers are wonderful products to even out tone, create good texture and achieve the right amount of sheen. Most formulas include some SPF which allows you to skip that step!

Application is refreshingly easy. If your skin is normal or dry, you may want to start with a serum or light moisturizer. Wait a couple of minutes to let it sink in and then proceed to the tinted moisturizer. Pour a largish pea-sized amount of product on your fingertips, rub your fingertips together gently to warm it up and then massage it to your skin as if you’re applying moisturizer. Make sure it has gone on evenly and you haven’t missed any bits. If your skin is combination or oily this amount of moisturizer is probably enough in the summer, but in your case take a fluffy powder brush and add a tiny amount of face powder to the t-zone (forehead, nose and chin).

A favorite of beauty editors everywhere (and mine also) is Laura Mercier’s Tinted Moisturizer SPF20. I also like Stila’s Sheer ColorTinted Moisturizer SPF 15. Both offer plenty of natural colors, comfortable wear and a very natural finish.

Saturday, August 20, 2011

The most underrated blending tool ever!

I need to address my love of tissues. They’re cheap, I always have them around and they do a wonderful job of blending in a pinch. Just do your face makeup like you would normally do – foundation, blush, bronzer – and then use a tissue to gently buff the edges. Concentrate on the jaw line and the cheeks.


And that’s it! Gone are any demarcation lines on your jaw or streaks from a too loaded blush brush. Your makeup is now perfectly natural.

Tuesday, August 16, 2011

Highlighting the best bits


I can almost hear Carmindy, the makeup artist who does her share of magic on the TV show “What not to wear”, raving about the magical highlighter. By highlighting you bring forward the features of your face that deserve attention. Also, since these areas draw the light, your skin seems to be glowing.

Two essential rules to using highlighter:

  1. Select the right product. Avoid anything with glitter or large shimmer particles. You’re looking for sheen rather than shine. There are plenty of products out there, including high-end ones like YSL’s Touche Éclat but you can also use pearly eyeshadow from your favorite drugstore brand.
  2.       Apply lightly in three places – under your brows, on the inner corner of your eyes and on top of your cheekbones – and blend well. Now that you’re done, go back and blend a little more with your fingers. Glow-y perfection!

Monday, August 15, 2011

Flushed


The blush look I try to recreate is the same that I get naturally, after exercising. My cheeks get a little flushed, a pink/reddish color and slightly dewy.

My current favorite achieves the finish I described above and is called Flush (Tarte clearly knows what they’re doing). It’s a cream-gel that sinks in and looks entirely natural. Though it feels a little sticky right after application, it dries after a few minutes. Staying power is a problem with most cream blushes but I find that this one does a good job of overcoming that.

Apply the stick directly to the apples of the cheeks (the part that is raised when you’re smiling) and blend with your fingers. Start small and build it up if needed. Let it dry until you can’t feel it anymore. Smile when people comment on how healthy you look.


Friday, August 12, 2011

Less shine please!

I live in Austin, TX, which means that the summer is ruthless. Temperatures are mostly over 100 degrees and it’s always sunny. Makeup literally melts when you walk out the door!

After putting on a moisturizer with a high SPF, I need something weightless that will keep shine to a minimum. Powder looks like makeup – a matte finish in August is too much of a giveaway – so I’ve found the perfect product to give me a fresh complexion that looks completely natural.

A pea size amount of Laura Mercier’s Secret Finish Mattifying makes my skin look velvety, like it’s been perfected. I apply it mostly to my t-zone (forehead, chin, nose and areas around nose) and I’m good to go. A friend recently commented that I don’t see affected by the heat. If only!