pages

Wednesday, October 5, 2011

Packing lightly for a roadtrip vacation

I wanted to have blogged about this before I left, but between the packing and the getting everything ready, I never did! I was out for a couple of weeks, roadtrippin’ with my favorite ally, across America. We are both obsessive packers with very different styles. He makes sure that we will be ready to deal with anything – flashlights, first-aid items, snacks – and I pack as little as humanly possible. : )

I’ve perfected my method over the years, picking clothing items that do double duty, limited color schemes and sample size toiletries. My makeup is no exception so I wanted to share the contents of my makeup bag for this trip and reference some of the posts I wrote in the past about these products.


My goal was to achieve a natural and easy look, using as few products as possible, in under 3 minutes.

For the face I used the Laura Mercier’s Mattifying fluid and it was enough for most days. If I wanted a little bit of coverage/evenness I went with LM’s Tinted Moisturizer. I also dabbed some concealer on my eyelids and under my eyes to look more awake. Casual and effortless but not shiny (I hate shiny foreheads and chins on vacation pics…)

My sample-sized Tarte Glam Gams bronzing stick became face bronzer because it works so well everywhere and takes up no space (no brush needed, either).

The eyes were all about polished brows thanks to e.l.f. Clear Mascara and defined long lashes with Tarte’s sample-sized Lights, Camera, Lashes! Mascara (the two products I was sure to use every day). Sometimes I added Lancôme’s eyeliner and a few nights I created a light smoky eye using L’Oréal’s eyeshadow and my lovely magical brush.

Loved my vacation, the pics look good and carrying my bag was easy – win, win, win!

Monday, September 19, 2011

Allure's Best of Beauty 2011


Fall is my favorite season! It’s a time of new beginnings, red foliage, cider, holidays, and cozy fall fashion (in Austin it won’t actually get cold enough to wear it until December, if we’re lucky, but we still get to admire it in shops).

Of all my favorite things there is one that is like Christmas and my birthday rolled into one – Allure’s Best of Beauty. Every year the editors at Allure test thousands of products, select their favorites in a range of categories and then publish the results in an amazing October issue! Awards are given in the following categories: eyes, lips, skin, nails, base (foundations, concealers, primers…), hair, scent, tools and a couple of smaller categories (sensitive skin, top splurges, natural wonders and guys’ stuff). There are also articles about the Hall of Fame, Breakthroughs and Cheap Thrills.

I spend as much time as possible delaying the gratification of reading the awards section – I read the entire magazine before I go there – and then spend hours examining the awards, looking at the gorgeous pictures and thinking about which products I’m going to try first. Can’t imagine anything better to do on a quiet Sunday morning like yesterday…

Check it out for yourself here and let me know which products get your seal of approval and which ones you can’t wait to try! I’ll write my own post about it this week.


Friday, September 16, 2011

Fundamental makeup brushes - recommended brands


Several makeup brands offer great brushes. As you can see from my last post, I managed to collect my makeup brushes from 6 different brands (and that’s before I explored my drawers and found 3 others…). Depending on your needs and level of investment you’re willing to make, here are three brands that are good across the board!

$ Sonia Kashuk Tools – everyone who has spent some time perusing the beauty aisles at Target knows these soft brushes. They are favorites of magazine editors and women everywhere. You really can’t go wroing - great quality at a great price.

$$ Sephora Collection Classic Brushes – Sephora is the ultimate makeup wonderland. The store’s brand products and tools are a good starting point. The selection is impressive and many of their brushes are double-sided, which I really appreciate.

$$$ MAC Brushes – These are the standard. I dare you to find a serious makeup artist that isn’t carrying at least one of these. Top quality, huge selection, every need covered. Follow the link to their interactive brush finder. Select your need from the menu on the right and have fun with the combinations!


Thursday, September 15, 2011

Fundamental makeup brushes

The previous post (where I talked about the eyeliner brush that changed my life) got me thinking about brushes. If you’ve ever seen a makeup artist operate, you know that they can use 20 different brushes while doing one person’s makeup. It makes you wonder, “Do I really need all that?”. The answer is, probably not.

What are the basic brushes you should have in your set, if you’re trying to create a natural no makeup look? Here’s my list of “can’t imagine living without them” brushes. Depending on the brand they’ll have slightly different names but you’ll be able to recognize them nonetheless:

1. Large fluffy powder brush
Honestly, you can’t apply powder in a natural way without a brush like this. This one is an absolute must have. Use it to set your makeup with a little powder, to apply bronzer or powder blush (I like to do that with a big brush) and to give a good once over blending when you’re done. It’s the ultimate multi-tasking brush.

2. Medium sized eyeshadow brush
When I first applied eyeshadow with a decent brush, I knew I’d never go back. This brush allows you to apply your allover color and it is small enough to that it will work on the crease as well. I also use it to blend all eyeshadow colors together and eliminate any hard edges. I must have another 5 eyeshadow brushes - different sizes, shapes, tightness of bristles - but I use this one 90% of the time.

3. Pointy eyeliner brush (bonus points if double-sided with smudge brush on other side)
It was the subject of a recent post and it was the reason I started thinking about basic brushes in the first place. I love it because it turns my entire eyeshadow collection into eyeliners. I can use it dry or wet, I can draw anything detailed, I can smudge pencil eyeliner, I can use it for gel eyeliner… Endless possibilities.

Those 3 brushes are my essentials, come rain or shine, at home or on the road, whatever style of makeup I’m wearing. I’ve got an additional 3 that depend on day, need, mood and product.

4. Mineral foundation brush
If I happen to apply mineral foundation rather than a tinted moisturizer, I’m going to need one of these. They’re sturdier than a fluffy powder brush and they are much better at achieving the buffing effect needed.

5. Liquid foundation brush (synthetic bristles)
Definitely less essential … I don’t *need* a foundation brush but I admit it achieves a beautiful effect and it’s easy to use. I wouldn’t carry it with me if I were traveling, I’d just use my fingers. Choose a synthetic one that isn’t porous, picks up the right amount of product and is easy to clean.

6. Small concealer brush (synthetic bristles)
I’ve seen two essential styles for concealer brushes – one is a larger brush meant to create a more “airbrushed” result and another one is a small pointy brush meant to reach inner corners of eyes and cover pimples or other imperfections very carefully. While I’m all about the airbrush, I find that I achieve that well enough with my fingers, so I rely on my concealer brush for detail work. Again, I could live without this on a desert island or most occasions, really. : )

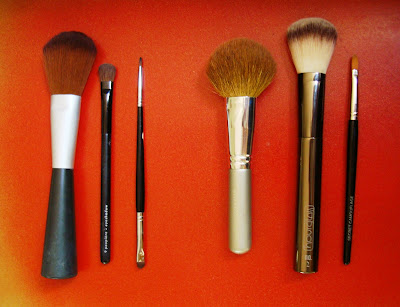
1 to 6, left to right (just noticed that all my brushes are from different brands!)


What are the brushes you can’t live without??

Wednesday, September 14, 2011

One brush = endless eyeliner options - pic

I took this pic right after I wrote the previous post but never got around to sharing it.


So here's the effect I achieved using the Stila's wondeful brush and the darker shade of L'Oréal's HIP concentrated shadow duo in Dynamic - a beautiful metallic antique gold and a shimmery dark olive bronze. It doesn't really qualify as a forgotten eyeshadow because I actually use it a lot.

I got my bonus points by smudging it and I achieved a very natural look with a just a hint of color. I left my lashes bare so the eyeliner effect was clearer in this photo, but would normally have added mascara.

Monday, September 12, 2011

One brush = endless eyeliner options


While my goal is to pretend that I’m not wearing any makeup and just look naturally polished, eyeliner is my weakness and the only place where I get a little “showy”. We’ve established that in my previous three posts about different levels of eyeliner intensity, especially in that last one (read all about it here).

Eyeliner pencils are great but my eyeliner philosophy was greatly augmented when I discovered this magic brush – Stila #28 Smudge Pot Brush. On one end it’s a pointy (rather than flat) eyeliner brush and on the other end it’s a tightly packed smudge brush.

Though it was designed to be worn with Stila’s Smudge Pots (and I’ll surely write a post about them at some point), the really interesting thing is that you can use it to turn just about any eyeshadow into gorgeous, custom eyeliner!

Start slow and easy and pick up any basic old eyeshadow that you haven’t used in a while. Maybe it’s a basic brown that you’re not crazy about because it doesn’t go on evenly or a forest green that you bought after reading about it in a magazine, but can’t imagine wearing it all over your lid. Find it and let's get started!

Now dampen the pointy side slightly with tap water, wiggle it in the eyeshadow a couple of times and carefully draw a line as close to your eyelashes as possible. Pick up more eyeshadow if needed until you’ve completed both eyes. If you are worried that you’re not enough of an “artiste” to make this work, let it go. It’s honestly super easy and forgiving, nothing like liquid eyeliner.

You can leave it at that or turn the brush around and use the other side to slightly smudge the line. When you’re done admire your work and then go unearth all the forgotten eye shadows you can think of – you have just breathed new life into your eyeliner options!


  XQ2RU7SDRR6S

Sunday, September 11, 2011

Eyeliner pencil – intensity 3


Well, once we go into eyeliner intensity 3 we are straying a little from our “no makeup look” ideals, but it’s worth it. Check intensity 1 and 2 for more natural styles and stick around for the heightened and smokin’ version of just eyeliner, as we line the inner rim of eye. I like this slightly disheveled and bohemian approach to eyeliner and enjoy sporting it in the evenings and even during the day on the weekends.

Start by adding concealer to dark circles and to the lid itself. Use something like bareMinerals Well Rested (check out my post about it here) or a creamier concealer applied with a brush and set with a little bit of powder. 

Now that the canvas is ready, take a kohl eyeliner such as Lancôme’sLe Crayon Khol in Brun or Urban Decay's 24/7 Glide-On Eye Pencil in Zero (a really inky and black liner) and sharpen it slightly so that you expose untouched product. Using your finger pull your lower lid down and show the inside rim. Line the inside rim of your eyes, both on the bottom rim and upper rim. Blink a few times and repeat the lining process.

For extra bonus run the pencil over the roots of lower lashes, working it in carefully. Do the same at the roots of the upper lashes, working from the top. Once you’re done, take a q-tip and smudge any excess around the roots of the lashes.

Add mascara and go show off this smoldering look!


Some people express concern over lining the inside of the eye – is it safe? Run a search online and you’ll find pros and cons. I’ve done it all my life, and though I’m a contact lenses wearer, I’ve never had any trouble. Here are a few tips that have helped me stay that way. Wash your hands with soap. Then sharpen your eyeliner slightly to expose new, clean surface. Don’t share eyeliners and discard if yours comes in contact with any kind of eye infection. Lastly, be careful when applying so you don’t accidentally scratch your eye (this is really not the makeup technique for a moving car…). If you wear contact lenses, you may notice a small amount of product accumulating on the edges of the lens. Remove and clean if it feels uncomfortable, and always clean extra well when you take them off at the end of the day.